Laurell WS-650
- Former user (Deleted)
- Richard Harlan
- Wirth, Justin C

Refer to the Material and Process Compatibility page for information on materials compatible with this tool.
Equipment Status: Set as UP, PROBLEM, or DOWN, and report the issue date (MM/DD) and a brief description. Italicized fields will be filled in by BNC Staff in response to issues. See Problem Reporting Guide for more info.
| Status | UP |
| Issue Date and Description | |
| Estimated Fix Date and Comment | |
| Responding Staff |
/wiki/spaces/BNCWiki/pages/6236892
iLab Name: Spinner3
iLab Kiosk: BRK Lithography Core
FIC: Shared
Owner:
Location: Cleanroom - M Bay
Maximum Wafer Size: 6"/150 mm
Overview
General Description
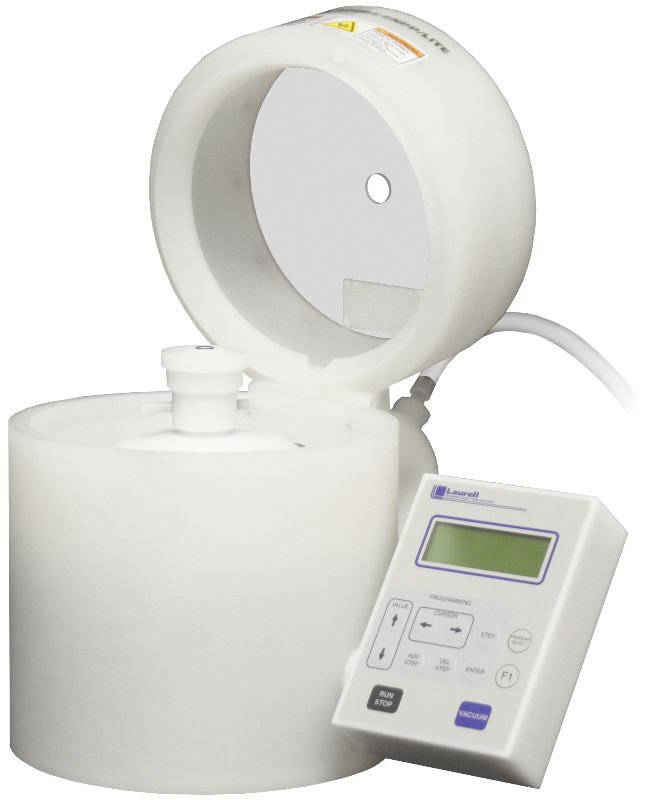
The Laurell WS-650-23 B spin coater is compact and packed with advanced features. This 650-series coater system will accommodate up to ø150mm wafers and 5" × 5" (127mm × 127mm) substrates, and features a maximum rotational speed of 12,000 RPM (based on a ø100mm silicon wafer).
Specifications
- Program storage: 20 programs, up to 51 steps each
- Maximum substrate size: 6"
- Speed: 0 - 12,000 RPM (maximum of 8000 RPM recommended) in 1 RPM increments.
- Acceleration/Deceleration time: programmable in each step with 1 RPM/second increments
- Dwell (spin time) per step: 0 - 5999.9 s in 0.1 s increments.
Sample Requirements and Preparation
Samples should at least be cleaned with the standard solvent clean, and Piranha cleaning may be used for substrates that will tolerate it. Adhesion of the photoresist will depend on the surface state of the wafer, and a clean, dehydrated, hydrophobic surface will offer ideal adhesion.
Important Notices
- NEVER flood or spray solvent such as acetone or any other type of cleaner directly onto the keypad surface. Doing so may cause keypad failure. Always wet a wipe or cloth with the solvent and gently wipe the keypad surface.
- Do not allow chemicals to enter the vacuum path.
- Do not at any time force fluids or pressuring gas in the center of the vacuum chuck. Cleaning the vacuum path in this manner may cause significant damage to the spin processor.
- Do not flood the process chamber during cleaning.
- Clean, rinse, then dry the spinner after each use, taking care to prevent any chemicals from entering the vacuum path. Cover the chuck during bowl cleaning with a chemical resistant cover. DO NOT FLOOD THE AREA BETWEEN THE STATIONARY SEAL AND THE ROTATING SEAL. THIS CAN CAUSE MOTOR OR ELECTRONICS DAMAGE. Do not fill up/overflow the process chamber or bowl – fluids must not be permitted to flow under the substrate.
Standard Operating Procedure
User Quick Start Instructions (Internal Resource)
Alignment_Tool_Use_Instructions
Manual_Topside_EBR_instructions
Below is the "Cycle of Operations" from the SOP. Refer to full SOP for detailed programming guide by opening the PDF above. Click on the other links above for useful information before using the spinner.
This instruction covers the use of the bench-top WS-650 Spin Coater system located in the cleanroom.
The Laurell WS-650-23 B spin coater is compact and packed with advanced features. This 650-series coater system will accommodate up to 150mm wafers and 5" × 5" (127mm × 127mm) substrates, and down to small pieces. It features a maximum rotational speed of 12,000 RPM (based on a 100mm silicon wafer).
These spinners are for approved acetone soluble resists only. Please contact jcwirth@purdue.edu with questions or new material requests.
CYCLE OF OPERATIONS – WS-650 Spinner
This procedure details how to operate the WS-650 Spinner system. Users must find the best parameters for their processes, starting points for common resists may be found on the BNCWiki Photoresists page.
4.1 Enable the WS-650 Spinner in iLab.
4.2 Turn on the spin processor.
4.3 Locate the appropriate chuck for the sample. The sample should complete cover any vacuum lines on the chuck.
4.4 Mount the chuck on the spinner
4.4.1 Do not force the chuck into position, or hit it with anything to seat it. Immediately stop and contact BNC staff for assistance.
4.5 Place and align a substrate onto the chuck. Press the “VACUUM” key to activate the vacuum valve.
4.6 Close lid and ensure the lid lock is secure.
4.7 Press “SELECT PROCESS” to view stored programs.
4.8 Highlight the desired program using the arrow keys.
4.9 Press the “EDIT MODE” button to create a new program or modify an existing one.
4.10 Use the navigation keys to move from line-to-line or the “tab<“or “tab>“ key to move to field-to-field.
4.10.1 The Tab key enables the field to be editable. Make changes to the field by using the
↑/↓ arrow keys.
4.11 Add or delete steps by highlighting the “Step” field with the “tab” key and increase or decrease the number.
4.12 Move from step-to-step by using the “FWD” or “REV” key. See section 5. PROGRAMMING THE 650 CONTROLLER for more information on creating/editing a spin program.
4.13 Press the “RUN MODE” key to run the program.
4.14 Dispense photoresist manually onto wafer.
4.15 Press the “START” key to start the program.
4.16 “Done” will be displayed when the process is completed and the lid has not yet been opened for wafer removal.
4.16.1 Restarting the same sequence on the same wafer is not allowed until the lid is opened or
the “EDIT MODE “key is pressed then the “RUN MODE” key.
4.17 Clean up.
4.17.1 After you are done with all your wafers, load the “Cleaning” dummy wafer onto the chuck and turn on the vacuum.
4.17.2 Spray acetone onto the wafer from a squirt bottle.
4.17.3 Clean Program:
Step 1: Time 10 sec, Speed 1000 rpm
Step 2: Time 10 sec, Speed 3000 rpm
Step 3: Time 10 sec, Speed 5000 rpm
4.17.4 Run the “clean” program and keep spraying acetone onto the wafer through the hole in the lid while the program runs.
This should spray acetone all over the inside and clean out the resist residue.
4.17.5 If any resist remains, do it again. If after a 2nd rinse, use a cleanroom wipe wetted with acetone to remove any remaining resist residue.
4.17.6 After it is all cleaned, do the same thing with isopropanol.
4.17.7 Wait for any solvent to drain into the waste reservoir, then remove it and dump it into the appropriate solvent waste container.
Rinse out the waste cup with acetone and isopropanol and dump it into the appropriate solvent waste container.
4.18 Leave the lid fully open to allow any residual solvents to evaporate.
4.19 Disable the tool in iLab.
Questions & Troubleshooting
Why has the spinner stopped/failed to spin? (ERR: Lid Open and ERR: Need Vacuum)
Unit has 2 interlocks that can halt operation. They include Loss of Vacuum and Lid Open faults. Loss of vacuum has several possible causes: 1) Poor placement of chuck. Chucks for pieces must be fully pressed onto the standard full wafer chuck for proper seal and good vacuum. 2) There is resist clogging vacuum hole in the chuck. Clean the hole out with acetone. 3) There is debris on the face of chuck or the back side of your sample. Clean the chuck with acetone. Re-clean your sample or try a different sample. 4) The vacuum path through the motor shaft is clogged. Contact the staff to correct the problem. The lid is also interlocked to insure that it is closed during spinning. Verify that both the lid is fully closed and the chuck is fully seated for proper operation.
Why is there a "Hot Purge" error on the screen?
The motor is beginning to overheat and needs to cool before running the next process. If the error occurs again contact BNC Staff.
What is a "Need CDA" error?
This error occurs when the nitrogen pressure drops below the 60 PSI requirement for operation. Contact BNC Staff for assistance.
Vacuum won't disable immediately after spinning?
Press the VACUUM button on the keypad to turn on/off the vacuum valve. Once actuated, and a program is running, the vacuum valve cannot be turned off until the motor is stopped @ 0 RPM for 1 second. This safety feature insures that vacuum cannot be inadvertently turned off until the chuck comes to a complete stop.
Why can't I rerun my process?
A design feature is included to avoid the accidental re-running of a process on the same wafer. In order to run a program twice on the same substrate, the lid must be opened or the program must be changed. If you desire to run the same substrate more than once simply press the edit key then the run key will allow another program cycle to be enabled without opening the processor. Vacuum to a substrate will automatically shut down after 10 minutes of non-use or when the lid is opened.
What happens if I input a negative RPM?
Negative speeds may be entered which causes the motor to rotate in the opposite direction.
Process Library